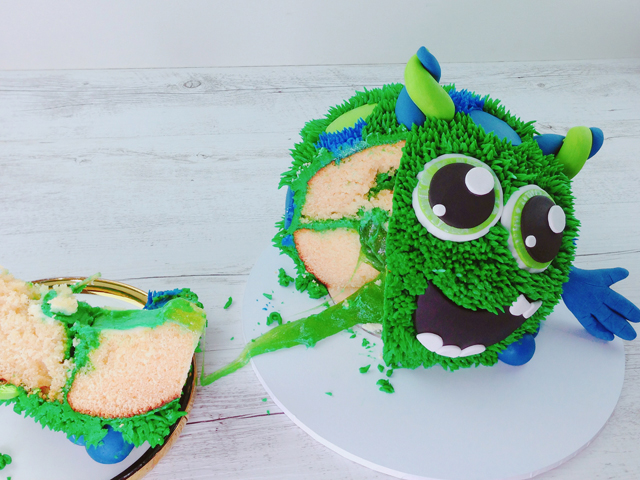
Edible Green Slime Monster Cake
Halloween is creeping up on us! Trick or treat your guests to these Edible Slime cake and cupcake creations thanks to Spotlight.
Over the Top has three Edible Slime colours (Monster Green, Princess Pink and Tropical Blue) which will take your Halloween baking to the next level! At $10 for a 300g tub, the Edible Slime is vegan, gluten free, nut free and egg free - best of all, it's Australian made.
From monsters and mermaids to unicorns and eyeballs, there is a recipe for everyone to celebrate with this Halloween!
Ingredients
1 x 6" ½ ball cake tin
2 x portions of moreish buttercake - see below recipe
2 x tubs of green 'Over the Top' buttercream
2 x tub of blue 'Over the Top' buttercream
1 tub of 'Monster Green' edible slime
1 set of round 'Mondo' cookie cutters
1 x 10" round white 'Mondo' Cake Board
1 x 5" round silver 'Mondo' cake board
1 tub of leaf green 'Fondtastic' fondant
1 tub of royal blue 'Fondtastic' fondant
1 tub of black 'Fondtastic' fondant
1 tub of white 'Fondtastic' fondant
A sharp knife
1 'Mondo' embosser wheel
1 small 'Mondo' rolling pin
2 different sized straws
Toothpicks
2 x bamboo skewers (optional for hands)
1 packet of 'Mondo' plastic piping bags
2 x grass piping tips
1 jar of 'Over the Top' sugar glue
Method
Bake The Cakes:
Utilizing the 6" ½ ball cake tin from Mondo, bake 2 portions of the Moreish Buttercake Recipe noted below by following the instructions.
Once the cakes are baked wrap in cling wrap and place into the fridge to completely cool and come to room temperature. By cooling the cakes it makes them easier to handle as well as avoid crumbling and breakages in the next step.
Using a sharp knife, level off the cakes so that they are even and when placed on top of each other, they form a perfect ball.
Then using the round plastic cookie cutters (We used the 7cm round for this step) Press the round cutter into the cake, it gives you the perfect depth and shape for this step - once you have pressed it into the cake to the middle ridge, edge it out on one side and it will lift the cake out for you, then to the other side.
Use a spoon to round the cavity out a little - be mindful not to dig too much into the cake, as you will weaken the wall of the cake.
If you don't have the round cookie cutters, you can use a stainless steel ice cream scoop or a large spoon. Be mindful to leave thick walls on your cake to support it.
On only one of the ½ cake balls, use a 5" round silver cake board to measure up the cake - this will become the base support of your cake. Using your sharp knife, slice the bottom off one only of the ½ cake balls to the same size of the silver cake board.
The ½ cake ball and the cake board should match very closely - a millimeter or 2 less is fine too as you will be cover the cake in buttercream next. Using some Green Over the Top Buttercream, spread on a good smidge onto the silver side of the cake board and secure it firmly to the bottom of the cake that you just sliced and leveled.
Handy tip - If you have another board under the other side, it's easier to flip the cake over once you are done.
Slime Prep
Using the Green Over The Top Buttercream, spread some buttercream inside both of the wells of the ½ ball cakes - this will stop your edible slime being absorded by the cake. It will create a buttercream barrier and which will help reduce crumb into your slime once cut open. Utilising a Mondo White Cake Board in 10"
round, remove the plastic, ready for use. Secure the bottom ball of the cake that has the silver cake board to the white 10" round cake board.
Handy tip - This can be done with any of the following, Melted compound chocolate or royal icing.
Next, fill each ½ with Edible Green Slime and pop into the fridge for 10 minutes to firm up, by cooling the slime you will help it stay firm when you perform the next step. Do not leave in the fridge for longer than 10 minutes as it will dry out the cake.
Buttercream
Use the Green buttercream to cover both halves along the top so they will stick together. Then pop your top ½ of the ball cake and secure into place with a light firm pressure - careful not to push down as you run the risk of cracking the cake.
Now you know why we kept the slime cool for this step of the process, made it so much easier and reduced the risk of it running away!
Next, buttercream a thin layer of Green buttercream and smooth out as best you can the entire ball.
Fondant Decorations
Roll out a about 100 grams of Black, Fondtastic fondant, using the Mondo small rolling pin with the thickest level guides on it - this will ensure you roll the thickness out evenly every time. Using the 10cm round Mondo cookie cutter on the smooth side, cut a round circle out, this is for the Monster's mouth. Using the 7cm round cutter, cut the top right section out of the circle, we are creating a lop sided smile for our little happy monster cake!
Then using the 9cm round cutter this time and matching it to the cut you made with the 7cm, do the left hand side too. It doesn't have to be perfect, just lop sided helps our little friend look adorable. Next, roll out approx 50 grams of White Fondtastic Fondant and using a small 2cm round circle cutter, cut out 5 circles. Then use the embosser wheel to create the teeth for your monsters smile.
Handy tip - If you don't have the embosser wheel a sharp knife will do the trick in a pinch.
Trim off approx ¼ off each "Tooth" and using a little sugar glue, or if you don't have it a tiny brush of water, secure the "teeth" in place. Next, roll out one Leaf Green and Royal Blue Fondtastic Fondant and using your round cutters, punch out a bunch of different sized circles, for example, 5cm, 6cm and 7cm and set your circles aside. These are for your monster's "spots". Roll out some White fondant, and using the 7cm round cutter, punch out 2 circles, these are for the eyes.
Next, roll out some Leaf Green fondant and using the 6cm cutter, punch out 2, these are for the coloured part (iris) of the eyes, you could do these in blue or even one blue and one green for fun!
Then roll out some black fondant and punch out 2 x 5cm rounds for the pupils of the eyes. Roll out a small amount of white and using a small round cutter, punch out 2 x 1cm and 2 x .25cm circles, these will be the points of light in the eyes.
Construction
Now it comes time to construct all the things you did, starting with the little circles you just punched out, these are point of light or reflection in the eyes. Use a small amount of sugar glue to secure them into place.
Handy hint - Straws are great ways to get small round shapes, its what I used for this project. Next, place the green 6cm circles and secure them to the 7cm white circles with a little sugar glue as shown. If you have one, use the Pearl pen on the green section to give the eyes a little more detail - this is an optional extra.
Secure the black pupils to the green Iris of the eyes with a little sugar glue and set aside.
Next, we are making the horns, take a ball of each of the Leaf Green and the Royal Blue fondant. Roll both out, one at a time, into a thick sausage, with each end tapered.
Handy tip - Rolling the end in your palm will make it easy to great the tapered ends.
Cut each colour in half and sit them up right, do not press together. Now comes the fun part, cross over the colours. You are aiming to twist the colours together gently to create a horn. Twist around each colour until the tapered ends meet, repeat this step to create 2 perfect horns! Leave aside to dry.
Position the mouth you made onto your monster cake ball on an angel and on the bottom ½ of the cake. Position his eyes however you like them, I placed mine close together to create an element of cuteness, and off centre to the mouth to create the illusion of a crooked smile and the positioning of the eyes already creates the illusion of him leaning on one side. Next pop in the horns. Remember to off angle them to keep in line with the illusion he is leaning to one side.
Handy tip - If you place 2 toothpicks on the underside of each horn, it will hold the horns more securely in place - just remember if serving the cake to children to remove the toothpick before serving the cake.
Toes
Next up are the toes, roll out an equal quantity of Royal Blue fondant. Cut each log in ½. Then cut one ½ in ½ again, and again to the end, this will give you 4 toes in different sizes. Roll each section into a ball. Place the toes to the right hand side resting on the board and the left hand side suspended up in the air. To make your life easier, a toothpick behind each toe that is suspended will keep it in place, remember to remove these before serving to children.
Next, stick on his spots in a random pattern using a small amount of sugar glue or water to secure them into place. To create the "fur" for your monster, use a Mondo plastic piping bag and a Grass tip, with Green and Blue buttercream. Have both bags ready to go as it will make the next part easier. Start pipping the "fur" onto his body in "tufts".
Handy tip - Holding the piping bag firmly, gently push to the cake, squeezing the bag and pull away releasing the pressure from the bag will give you great tufts of fur. Practice on your bench before you start - worse case, scrap it off and start again.
Keep on piping until you have finished. I made my monster mostly green with random tufted sections of blue.
Hands (Optional)
Roll out 2 balls of Royal Blue fondant.
Roll into 2 logs, keep one end thicker and then slightly flatten out the thicker ends. Cut thumbs out - keep in mind your hands when doing this.
Note - I've cut the 2 inside out.
Trim out the fingers and start to smooth the edge to create a more rounded finger, I created 3 fingers and a thumb. Trim off the ends and I would suggest inserting a skewer into them and leave them to dry until firm and self-supporting of their own weight. I positioned the hands, 1 up and 1 down to continue the illusion that he is leaning to one side.


MORE
FEMALE.COM.AU
CONTACT US
FOLLOW US ON
Copyright © 2001 - Female.com.au, a Trillion.com Company - All rights reserved.