Kitchen and Bathroom Refresh with Dulux Wash&Wear
Take On Your Inteirors: Kitchen and Bathroom Refresh
The kitchen and the bathroom are often the two rooms that see the most life – the kitchen being the heart of the home, and the bathroom serving as your very own personal oasis.
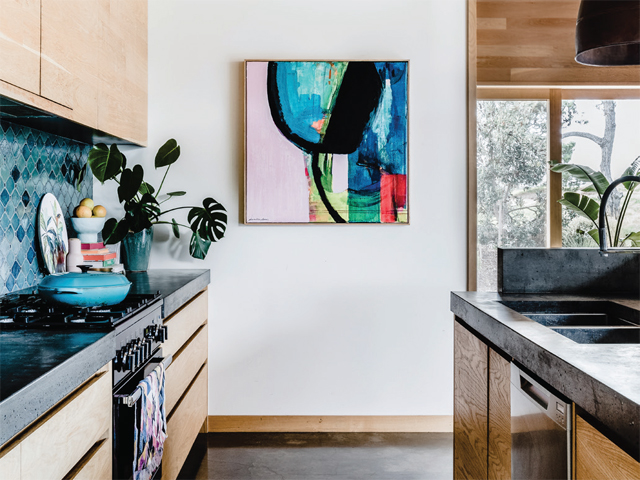
Of all spaces, the kitchen will see the most thrills and spills as a household spends a great deal of time in the space – seeing cooking condensation, the splattering of food prep and general signs of wear – so choosing a paint with extra washability and built in protection against bacteria and mould growth is hugely important. Dulux Wash&Wear +PLUS Kitchen&Bathroom will help you ensure your kitchen walls look pristine for longer, while keeping bacteria to a minimum and allowing you to keep the space clean, no matter how big the mess.
When repainting bathroom walls, ensure you use a paint such as Dulux Wash&Wear +PLUS Kitchen&Bathroom, and for the ceilings, Dulux Ceiling White +PLUS Kitchen&Bathroom, as they are formulated and guaranteed to last in damp conditions, given their mould and bacteria-resistant properties. Bathrooms see a lot of moisture and condensation from showers and baths, so it's vital to choose a paint that will resist mould and bacteria, with the peace of mind of a 10-year guarantee.
Whatever your interior style preferences, there are many quick and easy ways you can use paint to achieve a look you love, without having to break the bank. The kitchen should be charming, warm, and inviting, with personal touches to give a homely feel. Dulux Colour Expert, Andrea Lucena-Orr says that when it comes to updating your kitchen, it's all about choosing colours that complement not only the light in the room, but existing hardware and finishes.
"If you have both warm and cool-based colours in your kitchen – such as on your splashback, benchtops or furniture – consider a chameleon white and classic like Dulux Wash&Wear in Antique White U.S.A.®. It will work with most colour schemes, lighting conditions and not appear at all clinical, as some whites can. This colour then works as the perfect backdrop should you choose to build colour through accessories, furnishings or artwork," Andrea says.
In the bathroom, aim to create a mood that's both clean and elegant. This is, after all, your very own private spa designed to help you unwind.
Andrea Lucena-Orr says that choosing the right colour is imperative to designing a bathroom, as the colour can determine how the light reflects on your skin when you look in the mirror. "It's always best to use fresh tones that don't throw too much blue, red or green – If you want to be a little more adventurous than your standard white bathroom, opt for a 'barely there' pastel shade, such as Dulux Parchment Paper."
It is recommended to do a test patch of your chosen colour on the wall before painting the entire room. "Colours can look very different on the paint swatch compared to contextually in the actual space, so make sure you like the overall effect before you take the plunge," Andrea says.
"Repainting a door is another low cost but high impact upgrade when it comes to updating a bathroom's look and feel. Try painting the door in Dulux Elusive Blue which is striking against cool white walls, such as Dulux Lexicon®."
Updating your kitchen or bathroom can be an easy process that can be completed over the weekend. Here are some projects to get you on your way:
Walls:
1. Follow the preparation steps on the back of the Dulux Wash&Wear +PLUS Kitchen&Bathroom can and gather your painting supplies. Dulux 1Step Prep can be used for a prep coat.
2. Start by cutting in around the edges of the wall with a brush.
3. Load your roller in the tray with a reasonable amount of paint.
4. Start rolling the wall in an 'M' pattern. Start closest to the natural light source. Continue over the same section until the wall is evenly covered.
5. Using an unloaded roller (begin in the top left corner of your wall) gently roll down the roller to the baseboard in a straight line with no pressure. A lightness of touch will prevent new roller marks from forming. Repeat this action, only this time slightly overlap your last movement, so your roller rubs away the line created by the previous stroke. Continue this across the area you have painted. This is called laying off.
6. Reload your roller and repeat until the wall is complete.
7. Allow first coat to dry and repeat the total process again with a second coat.
Ceiling:
1. Clean your ceiling. Remove cobwebs with a clean broom and wash the area with Selleys Sugar Soap.
2. Tape around cornices, edges and any down lights and gather your painting supplies, including your can(s) of Dulux Ceiling White + Kitchen&Bathroom.
3. Just like a vertical wall, begin by cutting-in where the roller won't reach. Using a paint brush, paint around down lights and edges to create a border.
4. Once you've loaded your roller evenly, begin in one corner and move fluidly in a parallel motion. For best result, work in one metre sections painting across then down. Roll as far into the previously brushed sections as possible.
5. While paint is still damp, begin laying off the paint. This is a crucial step in achieving a smooth and consistent finish. Using an unloaded roller, begin in the top left corner of your ceiling and gently pull towards you in a straight line with no pressure. A lightness of touch will prevent new roller marks from forming. Repeat this action and slightly overlap your last movement so your roller rubs away the line created by the previous stroke.
6. If your ceiling requires two coats, wait two hours for it to dry and then repeat steps 4-6
Door:
1. Follow the preparation steps on the back of the can of Dulux Aquanamel and gather your painting supplies.
2. If your door has already been painted with enamel, give it a light sand until the shine has become dull. Wipe off the dust.
3. Use Dulux 1Step Prep to prime the door before applying a topcoat.
4. Using a synthetic brush, start painting the front panels of the door. Then, fill in the vertical sections between the panels; followed by the horizontal sections at the top, middle and bottom; and finally, the outside panels.
5. Once you've completed an area, while paint is still wet, lightly smooth over the painted section with long brush strokes. Do not reload the brush when you do this, a few brush strokes should be enough to smooth the surface.
6. Allow 2 hours to dry, then give the surface a light sand with 400 grit sandpaper.
7: Repeat steps 4 and 5 for a second coat.
Dulux Wash&Wear +PLUS Kitchen&Bathroom Dulux Wash&Wear +PLUS Kitchen&Bathroom Low Sheen is made with the hard wearing, stain and mark resistant 101 Barrier Technology, fortified with a powerful mould-inhibitor. This gives exceptional washability and is developed specifically for damp and humid environments such as kitchens, bathrooms and laundries.
Dulux Aquanamel®
A water-based interior and exterior acrylic enamel, Dulux Aquanamel® doesn't yellow over time, is fast-drying, low odour and achieves an ultra-smooth and tough finish that resists chipping.
Dulux Ceiling White +PLUS Kitchen&Bathroom
Dulux Ceiling White +PLUS Kitchen&Bathroom. Ceiling White +PLUS Kitchen&Bathroom is an advanced whole-of-home ceiling formulation with Mouldshield protection. It is tintable to light colours and has superior opacity to provide excellent hiding power, making it perfect for the whole home.
For more information about simple interior painting projects for the home using Dulux Wash&Wear, visit www.dulux.com.au


MORE
FEMALE.COM.AU
CONTACT US
FOLLOW US ON
Copyright © 2001 - Female.com.au, a Trillion.com Company - All rights reserved.